Provisional Pricing

Provisional Pricing in Methvin Estimate App

In construction estimating, there are often items where the cost is not yet finalized — such as elements awaiting design confirmation, vendor quotes, or client decisions. Instead of delaying your entire estimate or entering a rough guess, Methvin’s Provisional Pricing feature lets you assign temporary placeholder rates to such items.

Using the Provisional Pricing Feature

Activate Provisional Pricing

  • In your estimate worksheet, go to the toolbar and click on the “Provisional Pricing” provisional_pricing.png button.
  • This will activate Provisional Pricing mode — any cost rate you enter now will be marked as Provisional.

Enter Provisional Rates

  • Select any line item (e.g., floor tiling, footing, skirting board, or wall).
  • Enter the cost rate for items you’re currently unsure about.
  • These rates will now be flagged as provisional and visually identified for future reference.

Exit Provisional Mode

  • Click on the Provisional Pricing button again to exit this mode.
  • Any rates entered now will be treated as regular (non-provisional) cost entries.

Filtering Provisional Rates

  • Go to the Cost Rate column in your pricing tab. 
  • Click the filter icon and select “Provisional”.
  • This will display all items with provisional rates, grouped in one place for easy review.

Finalizing Provisional Items

  • When you open a worksheet of a provisional item, you'll see:
    • A label in the top-right corner saying “Provisional Price”.
  • Once you have completed the cost breakdown and finalized the price:
    • Simply untick the “Provisional Price” checkbox in the top-right corner.
  • The item will now be treated as a regular priced item.
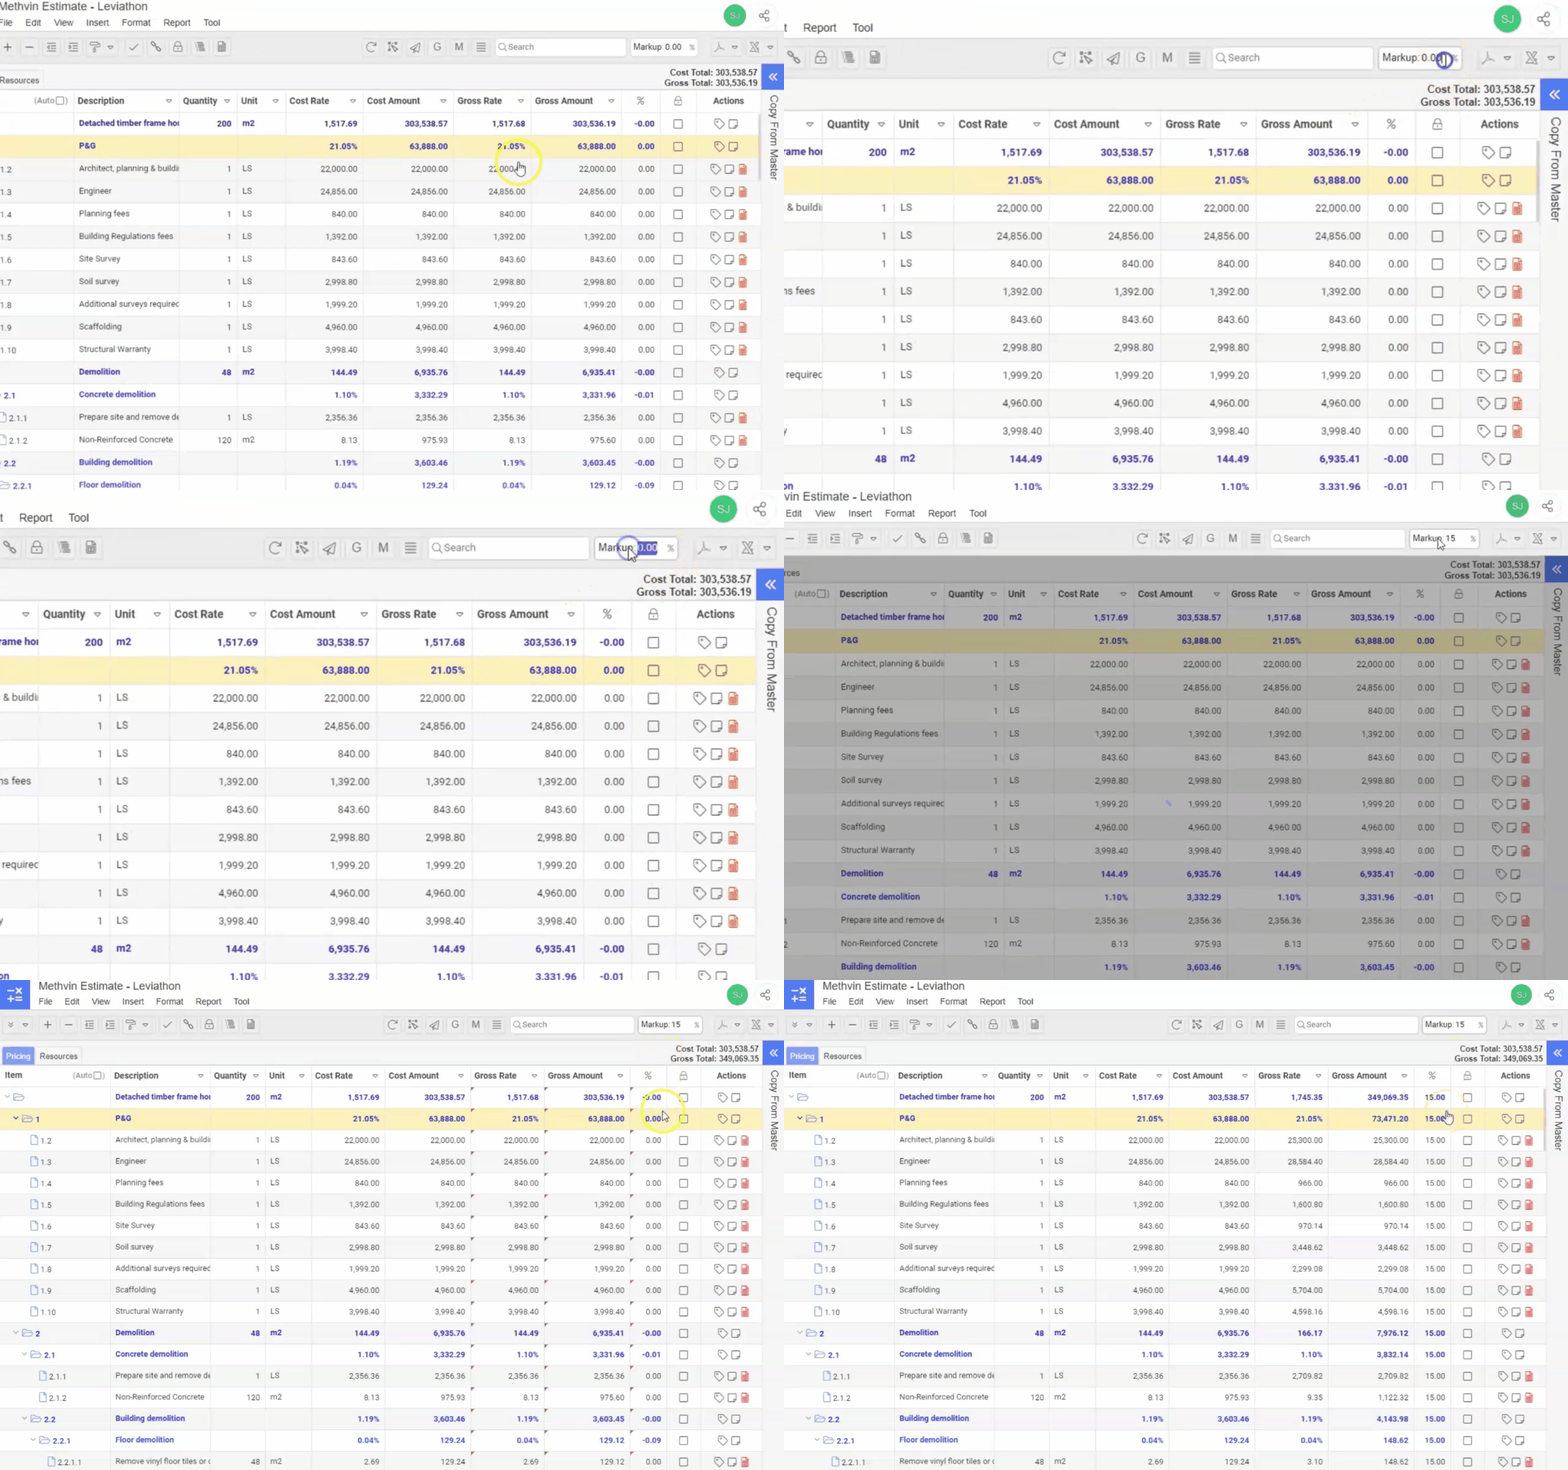
Set Markup

Set the markup for the project

Setting Markup 

In any estimation process, accurately applying markup is crucial to ensuring profitability and covering overhead costs. Methvin provides flexible options for setting markup, allowing you to apply a general markup across the entire project or customize markup percentages for individual items.

Setting General Markup 

  1. Locate the Markup field on the right-hand side of the toolbar.
  2. Enter the desired markup percentage. This will set the general markup for the entire project.

⚠️ Ensure that all items in your project are unlocked. The general markup will only apply to unlocked items.

Setting Markup for Individual Items

  1. In the Bill of Quantities (BoQ) table, locate the item for which you want to set an individual markup.
  2. Find the % column next to the item.
  3. Enter the desired markup percentage directly into the % column for that specific item.
  4. This allows you to customize the markup for individual items, independent of the general project markup.

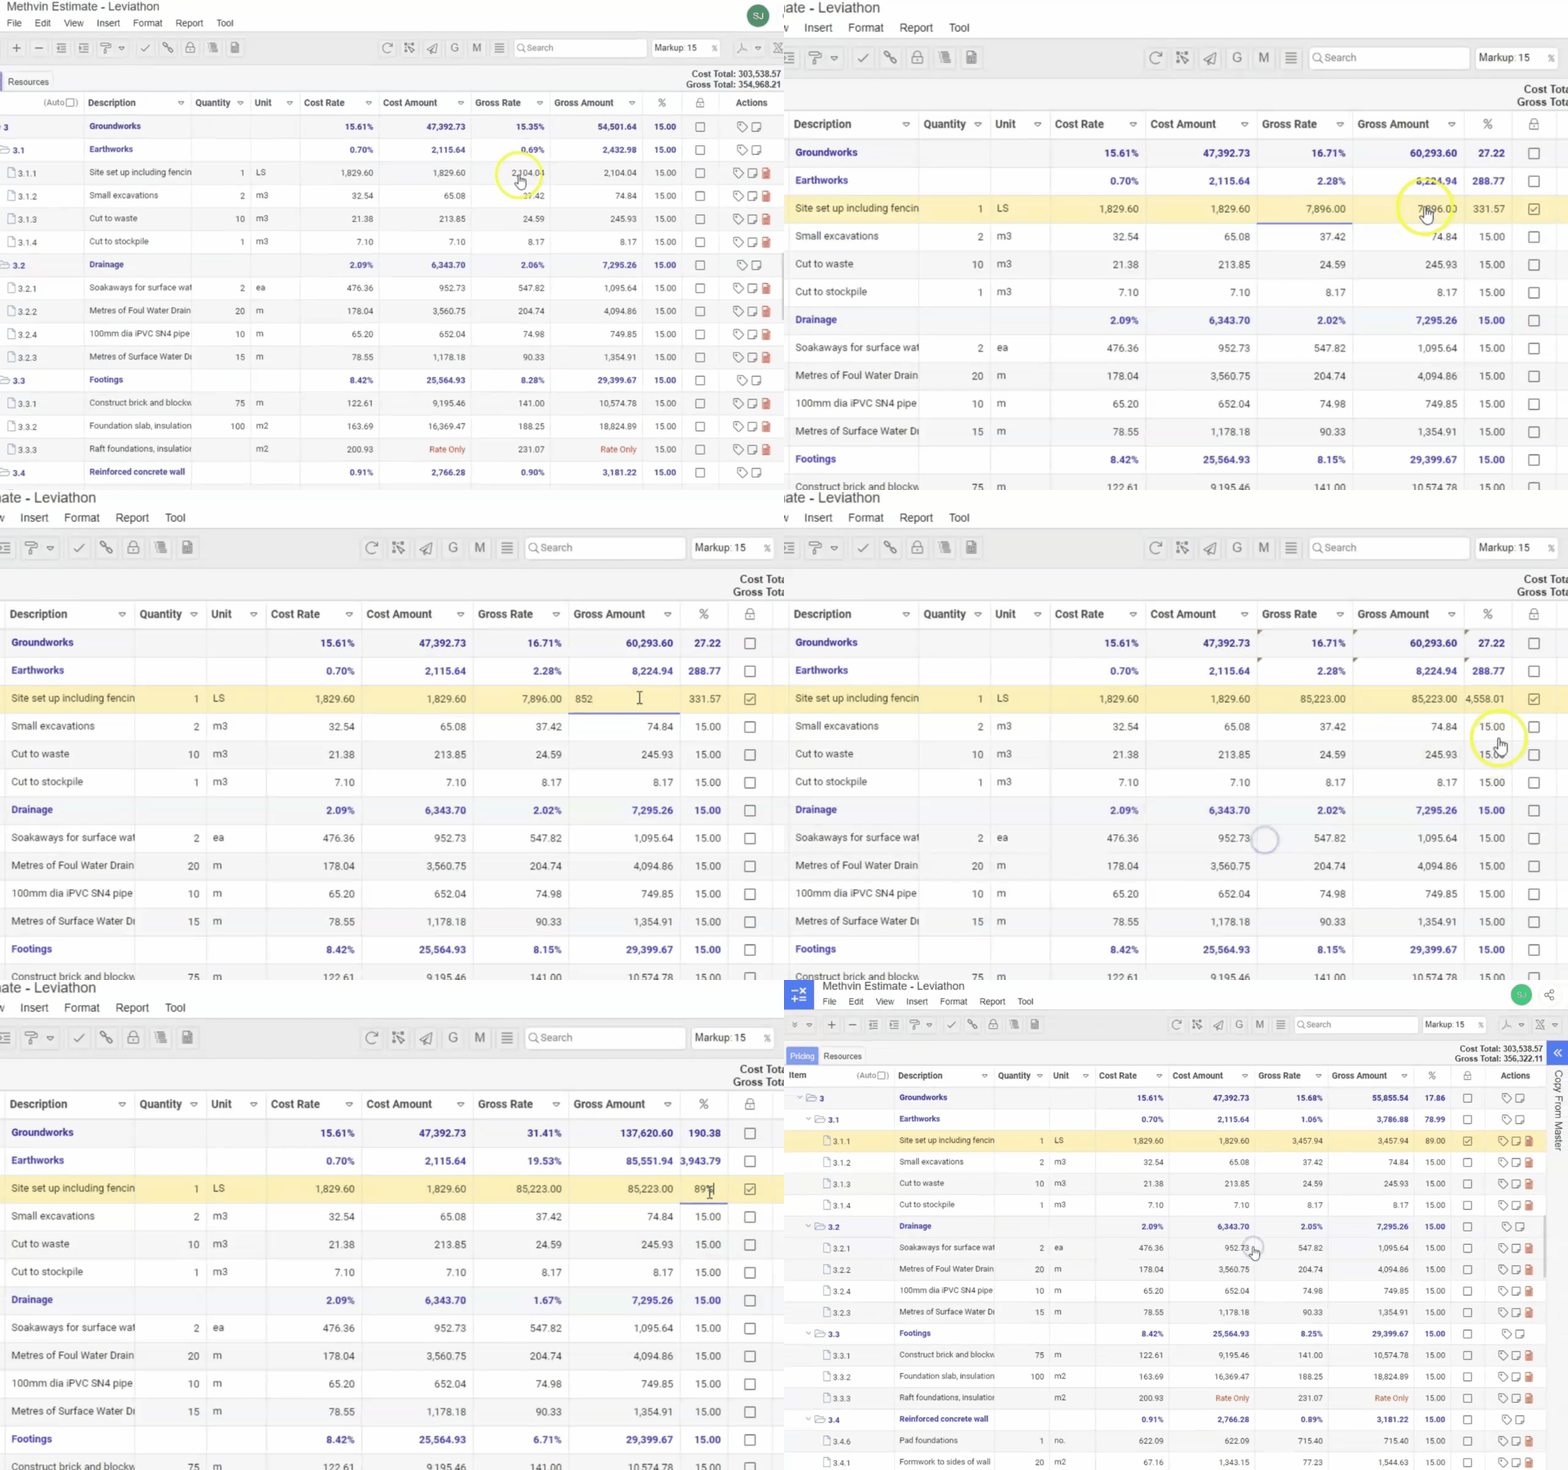
Editing Imbalanced Rates for an Individual Item

  1. For any bill item where you need to adjust the rates, find the respective columns next to the item in the BoQ table.
  2. You can edit the Gross Rate, Gross Amount and Markup percentage directly in these columns.

This flexibility allows you to fine-tune the financials of individual items to reflect any specific conditions or agreements.

Linking Worksheets

Linking Worksheets

Methvin provides a powerful feature to link a single worksheet to multiple Bill items, ensuring that any updates or changes are automatically reflected in all linked items. This feature is particularly useful when several items share similar calculations or data, streamlining your workflow and reducing redundancy.

Linking a Worksheet to Multiple Bill Items

  1. In your Bill of Quantities (BoQ) table, select the Bill item that already has a worksheet associated with it.
  2. Next, select one or more additional Bill items that currently do not have a worksheet.
  3. With your items selected, use the Link Worksheet option from the Insert Menu or the Link  icon located in the toolbar or by accessing it in the context menu by right clicking on the selected item.
  4. The selected worksheet will now be linked to all chosen items, making the worksheet appear in each of them. 

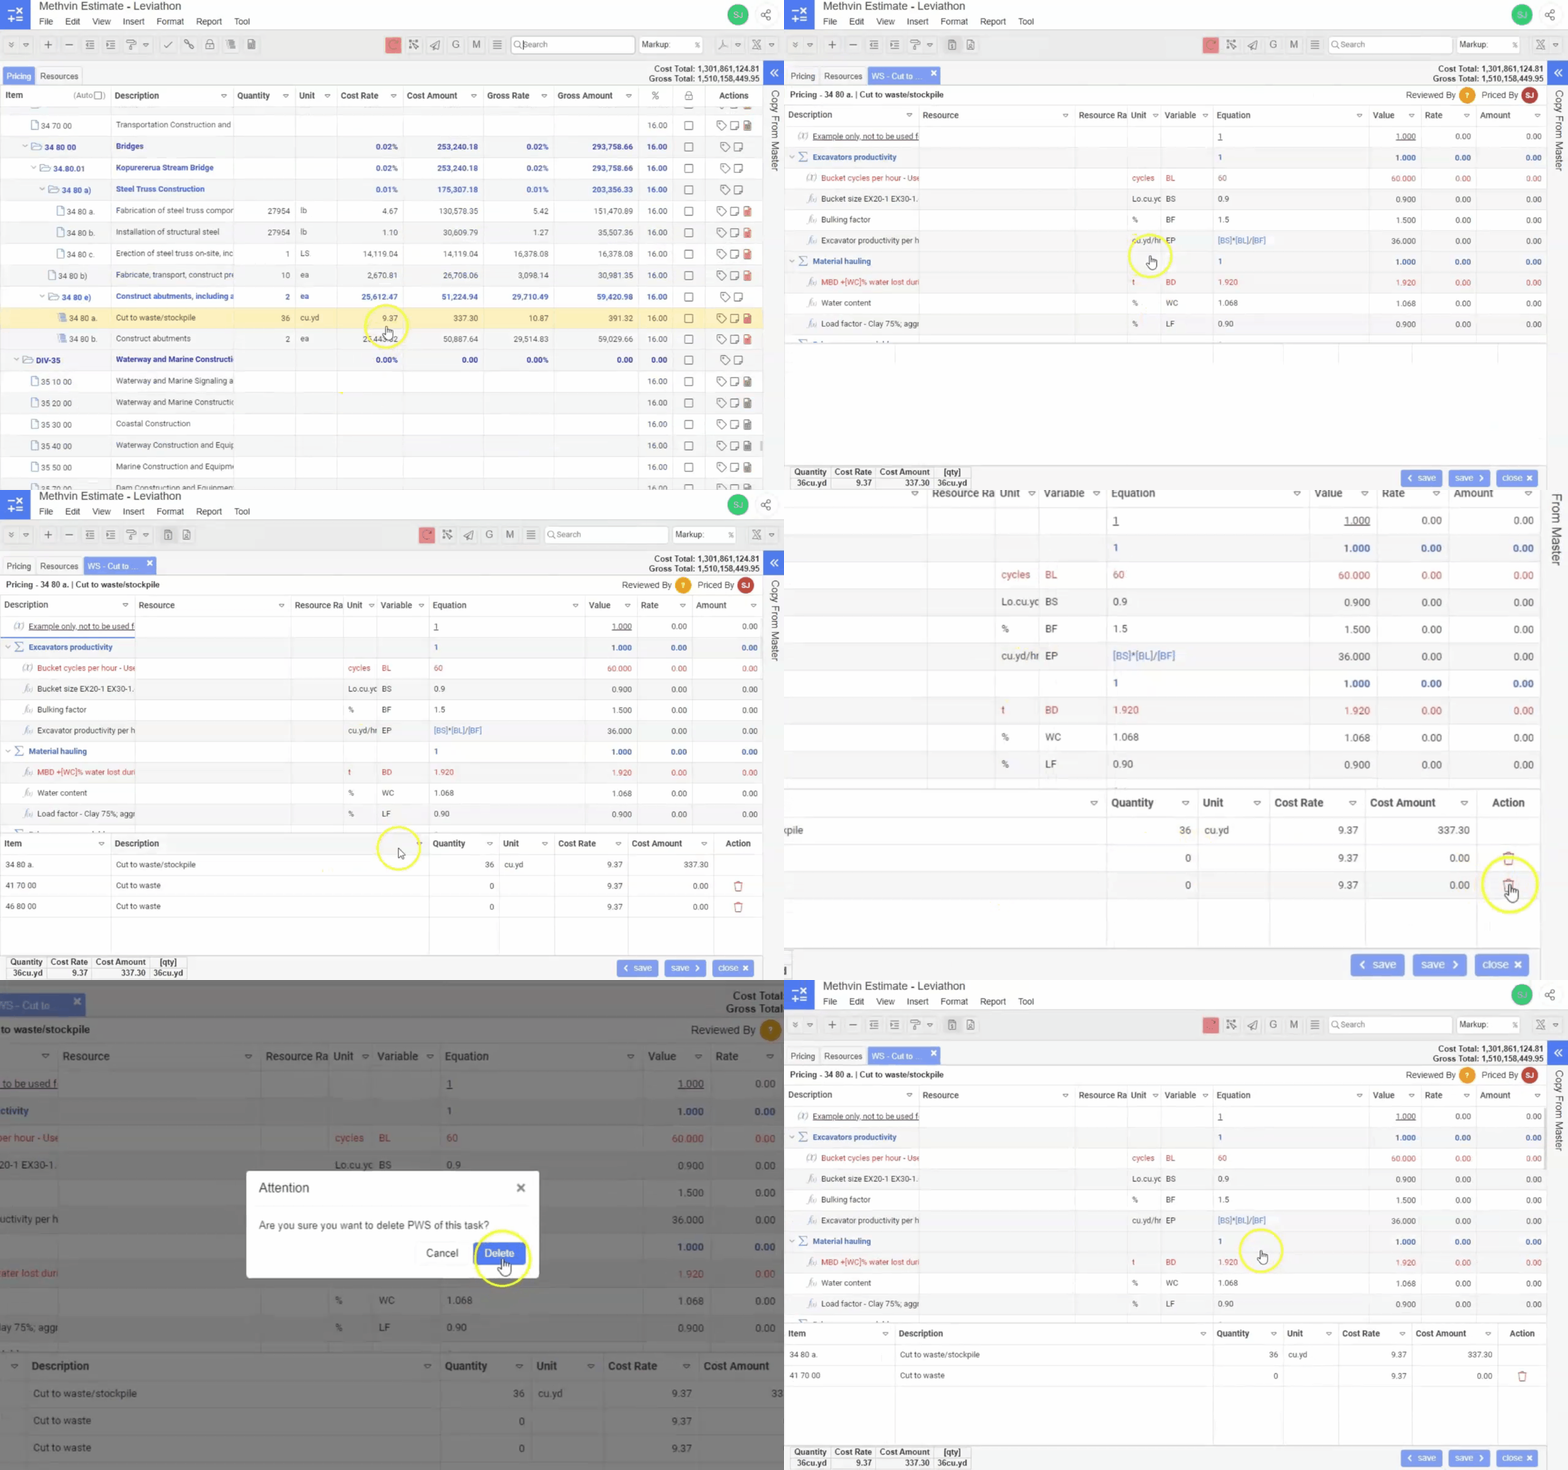
Unlinking a Worksheet

  1. Navigate to the bottom panel In the worksheet tab.
  2. Find the Bill item that originally did not have the worksheet linked to it.
  3. In front of this item, locate the delete  icon and click on it.

Create Subschedule

Subschedules

Sub-schedules are a powerful feature in our estimate software, allowing you to add endless detail to your project estimates. While sub-schedules provide an in-depth breakdown of specific tasks or items, it's important to note that they do not appear in the client's bill report.

Creating Subschedule

  1. Navigate to the Bill of Quantities and select the item for which you want to add detailed Subschedules.
  2. Click on the Subschedule  icon in the toolbar. Or access it in the Insert Menu. 
  3. A new bill item will be created under the item you selected with the subschedule  icon beside it.
  4. Add description or worksheets to your sub-schedule.

support@methvin.org

+64 27 702 1701