Auto Estimate is designed to revolutionize your estimation process by allowing you to import up-to-date price rates and production rates from tens of thousands of our materials API directly into your pricing, resources, and worksheets. This eliminates the need for manual entries and ensures that you always have the most current and accurate information at your fingertips, saving you valuable time and effort.
⚠️Production rates and units are based on the imperial system (used in the USA and Canada). However, material rates are automatically converted to your local currency for accurate cost estimation.
Accessing the Auto Estimate
Select a bill item to add a material to.
In the estimate interface, locate and click on the Auto estimate icon in the toolbar.
You can also access the auto estimate by right clicking on a bill item.
Upon clicking the icon, a side panel will open on the right side of the screen.
Searching for material
In the search bar at the top of the side panel, type the name of the material you wish to add to your project. For example, you can type "LED" to search for LED lighting options.
A list of search results will appear below the search bar, displaying various materials that match your search query.
You can choose any material you wish to add either by searching or just browsing through the available options.
You can enter a location to obtain accurate pricing based on your project’s location.
Exploring Options
Review the available materials in the search results. You can see essential details such as the product name, price per unit, and any available allowances.
The products offer additional options, such as:
Include Labor: Check this box if you want to include labor costs associated with the item.
Include burden cost: Check this box if you want to include the burden cost of your labor overheads costs.
Adding material to Your Project
Once you have selected a material, click the "Add to Project" button. This will add the selected item to your project's estimate with all the specified options.
Refresh Auto Estimate Options
Refresh Auto Estimate Labor
This option allows users to refresh the labor rates in their project estimates. The rates are updated based on the most recent data from the API, ensuring that the labor costs and production rates reflect the latest market conditions.
Accessing Refresh Auto Estimate Labor
Navigate to the Tool in the application menu.
Select "Refresh Auto Estimate Labor" from the dropdown options.
This action will automatically update all Auto Estimate labor-related costs in your project, including the hourly rate, labor cost per unit, and production rate. It ensures that your estimate is aligned with the latest available rates.
Refresh Auto Estimate Material
This option allows users to refresh the material rates in their project estimates. Like the labor refresh, this ensures that all material costs are up-to-date based on the latest pricing data from the API.
Accessing Refresh Auto Estimate Material
Navigate to the Tool in the application menu.
Select "Refresh Auto Estimate Material" from the dropdown options
This action will automatically update all Auto estimate material-related costs in your project, reflecting the most current prices. It ensures that your material estimates are accurate and up-to-date with the latest market information.
Auto Estimate’s CSI MasterFormat Integration
We are thrilled to introduce our new auto estimate feature, which fully automates the integration of CSI's (Construction Specifications Institute) MasterFormat and UniFormat standards. This feature ensures that your project data is organized consistently across all estimates and documentation, significantly reducing the potential for errors when setting up cost centers and compiling estimates.
MasterFormat's detailed divisions and sections provide precise tracking of costs associated with specific project components. This structured approach makes it easier to monitor budget adherence and identify potential cost overruns early. With a clear and standardized format, project managers and accountants can quickly assess financial allocations, leading to better control over project finances.
Additionally, our software's compatibility with other accounting and estimating tools designed around MasterFormat allows for automated cost allocation and reporting. This reduces manual data entry errors and enhances efficiency. The standardized format also facilitates seamless data transfer between systems, such as from estimating software to accounting software, ensuring that financial records are always up-to-date and accurate.
This integration not only streamlines your workflow but also ensures the highest level of accuracy and efficiency in managing project costs.
The Subcontractor Adjudication feature in the estimating app streamlines the entire process of managing and comparing subcontractor rates, making it easier to ensure you get the most competitive pricing for your projects.
Key Features
Efficient Rate Comparison Users can seamlessly compare rate lists from multiple subcontractors. The system imports rates from subcontractor worksheets and automatically integrates them into your estimate. This feature eliminates the need for manual data entry, saving time and reducing the potential for errors.
Worksheet Management Manage subcontractor worksheets with ease, allowing for better organization and tracking. The feature supports the importation of rates directly from subcontractor documents, ensuring consistency and accuracy across all entries.
Quote Integration Once rates are imported, the platform automatically integrates subcontractor pricing into your Bill of Quantities (BoQ). This streamlined approach ensures that all subcontractor pricing is accurately reflected in the overall project costs without the hassle of manually entering or updating numbers.
Powerful Comparison Tools The app offers advanced comparison tools that enable users to evaluate multiple subcontractor quotes side by side. This makes it simple to spot discrepancies, compare pricing strategies, and determine the most cost-effective subcontractor for specific tasks. Users can also filter or group quotes based on specific criteria such as service type, location, or trade specialty, enabling a more focused analysis.
Export for Analysis All data can be easily exported for further analysis. Whether you want to run a deeper analysis or share the information with stakeholders, the export feature allows for smooth data transfer into other platforms like Excel or project management software.
Benefits
Improved Efficiency: Automate the comparison and integration process, reducing the time spent managing subcontractor bids.
Accurate Pricing: Ensure that all pricing from subcontractors is accurately captured and reflected in your project’s estimates.
Data Transparency: Get a clear, comprehensive overview of subcontractor pricing, empowering you to make well-informed decisions.
Easy Collaboration: Share subcontractor data with your team or clients in an organized format, improving communication and decision-making.
This feature is designed to help project managers, estimators, and procurement teams simplify the process of subcontractor management, ensuring you get the best rates and maintain control over your project costs from start to finish.
Accessing the Subcontractor Adjudication Feature
Navigate to the Application Toolbar and click on the Subcontractor Adjudication .
This will open a window displaying a list of Subcontractor Trade Categories. To start working with subcontractors, you first need to add a new Subcontractor Trade Category to the list.
Adding a New Subcontractor Trade Category
Click the New button to create a new Subcontract trade category.
The system will generate a default Category (e.g., "Trade 1"). You can rename it by double-clicking on the name.
Select the newly created Subcontract Trade Category to open the Subcontract Adjudication form where you’ll add and manage subcontractors.
Adding Tasks to the Subcontract Adjudication Form
In the Subcontract Adjudication form you'll first need to add tasks that subcontractors will be quoting against.
On the right side of the panel, you’ll find the Import Bill Item from the BoQ option. Click this to open a side panel.
From the side panel, drag and drop the relevant tasks into the Subcontract Adjudication form to create the Subcontractors Schedule Of Quantities. These tasks will form the basis for the subcontractor's pricing.
Managing Subcontractors
To add subcontractors to your subcontract adjudication form, click on the Manage Subcontractor in the right side of Application Toolbar.
In the window that opens, click Add New to create a row for a new subcontractor (e.g., "Subcontractor 1").
You can now see the subcontractor details, including:
Subcontractor Name, Attribute, and Company which you can edit as to your liking.
In the Factor field you canadjust the formula and percentage for this subcontractor's rate list.
In the Currency details define the currency code and it’ll show the conversion rate.
Rate Modifier, Total Columns and Total Unlinked tasks are also displayed
Status of Spread/Used will display information on unlinked tasks and if the subcontractor is in use.
An action column provides a Delete icon for subcontractor removal.
Once you've added a subcontractor, click the close button. This will update the list of subcontractors in the Subcontractor Adjudication form.
Importing and Managing Multiple Subcontractors
You can add multiple subcontractors to compare their rate lists side by side.
Each subcontractor will have a separate column, allowing you to evaluate different rate lists across the tasks you’ve added to the worksheet.
Adding Subcontractor Rate Lists
Once the subcontractors are added in the subcontractor adjudication form next to the subcontractors schedule of quantities , Access the Rate List Options from the columns heading dropdown,
Import from Excel: Allows you to click or drag-and-drop an Excel file containing the rate list.
Import Cost Rates: Use this option to import cost rates directly from the pricing tasks.
By Resource Type: Selecting this option will open a list of resources within your project. From here, you can browse and select specific resources and their corresponding rates to be applied to the subcontractor's column. You may choose materials, labor, or equipment resources that are directly relevant to the tasks assigned. Thisis beneficial when subcontractors can only provide specific services.
From Subcontractors: When you select this option, it opens up a dropdown with several options like,
Copy and Replace: This option allows you to either copy or replace rates from another subcontractor. It’s useful when you need to quickly apply rates from a different subcontractor to the current one.
Copy Unpriced: If the selected subcontractor has unpriced tasks, this option provides further choices for handling those unpriced items,
Add Highest Rate: Automatically assigns the highest rate available from the subcontractors to the unpriced tasks.
Add Lowest Rate: Assigns the lowest rate from the subcontractors to the unpriced tasks.
Add Average Rate: Calculates the average rate of all available rates from the subcontractors and applies it to the unpriced tasks.
Add Unpriced of selected Subcontractor: Copy the rates of selected subcontractor’s priced tasks and insert them in the current subcontractors unpriced line items.
Add Rates: This option allows you to add rates from the chosen subcontractor to the current subcontractor’s list
Subtract Rates: This option subtracts rates from another subcontractor’s rate list from the current one. This feature is particularly helpful when subcontractors are only providing specific services, and you need to remove any unrelated rates from the subcontractor’s rate list, leaving only the relevant rates.
Unprice Subcontractor
The Unprice Subcontractor option in the column heading dropdown allows you to remove the pricing for the selected subcontractor. This can be useful if you need to clear out the rates for a specific subcontractor without affecting other subcontractors. Once this option is selected, all rates from the subcontractor will be unpriced, leaving the column empty for further adjustments or updates.
Managing Unlinked Items
Unlinked items are subcontractor-provided items that are not in the Subcontractors Schedule of Quantities. To handle these you can access the following options in the column heading dropdown,
Spread Unlinked Items: Spreads the rate of the unlinked item across the existing bill items, without showing the unlinked item.
The status of the subcontractor will show as “SPREAD” when the spread unlinked item option is used
2. Remove Spread Items: Displays the unlinked item separately from the rest of the bill items, providing transparency for these additional tasks.
Rates to Bill (Send Rates to BoQ)
The Rates to Bill option, also accessible from the column heading dropdown, allows you to add subcontractor rates directly to the pricing worksheets. When you click this option, a window opens containing resource selection options, worksheet options and transfer options. These include,
Resource selection options
Description: Where you select the resource you want to use in worksheets.
Unit
Rate
Currency
⚠️Resource have to have a rate of 1 to be eligible as a resource to be used to import the subcontractor rates into the the Bill worksheets
Worksheet Options
Add/Update: This will simply add the selected subcontractor's rate to the existing worksheet. If the resource is already present, the subcontractor rate will be updated.
Suspend Existing: This option will suspend all the other existing line item rates in the worksheet, displaying only the subcontractor's rate in the cost amount for the task. Other rates will be retained but will not affect the cost calculation.
Clear Existing: Checking this box will delete all the existing line items in the worksheet and add only the subcontractor’s rate. This is useful when you want to ensure only the subcontractor’s rate is used for a specific task.
Replace Resource Type: This option suspends the selected resource types eg. Labour, Plant, Material or Subcontractor in the worksheet and adds the subcontractor's rate.
Transfer Options
Copy Subcontractor Name to Resource Remarks: Adds the subcontractor’s name in the Remarks column in front of the selected resource.
Mark Worksheet Provisional for Provision S/C. Rate: Marks the worksheet as provisional, indicating the subcontractor’s rate is provisional.
Clear provisional worksheet markers: Deletes any worksheets that have been marked as provisional.
Comparing Subcontractor Quotes
Use the Compare Quotes option to view the details of subcontractor pricing. This includes details of the,
Column Amounts
Maximum, Minimum, Preferred Makeups
Pricing Totals etc
This comparison makes it easy to evaluate which subcontractor offers the best value for specific tasks.
Export to Excel
The Export to Excel option allows you to generate and download an Excel file containing the subcontractor rate details. This feature offers two choices:
Export Subcontract: This option exports all the tasks in the subcontractor schedule of quantities.
Export Selected Subcontractor: This option exports only the rate list and details of the subcontractor you have currently selected, allowing for a focused analysis of specific subcontractor data.
Auto price from Master and Auto price from Projects
The Auto price feature allows users to efficiently price unpriced bill items by using data from similar items either from a Master or from other Projects. This can save time by pulling accurate pricing data from pre-existing resources.
Auto price from Master
The Auto price from Master option lets you price bill items by matching them with similar items in a master you select. Before using Auto price from Master, ensure you have added a Masterto your project.
Access Auto price from Master
Click the Auto price from Master located in the right-hand toolbar.
This opens the Auto price window where the system will display matched data for your unpriced bill items.
Auto price Window Overview
The window displays matched items with the following headings,
Item: The bill item number from your project.
Description: The description of the bill item.
Unit: The unit of the item in your project.
Master Description: The corresponding description of the item in the Master.
Master Unit: The unit in the Master item.
Master Cost Rate: The cost rate of the Master item.
Percentage: How closely the project item matches with the Master item.
Tick Column: A checkbox to select the item to be Auto priced.
Actions Column: View the worksheets for the master item.
Auto price the Selected Item
Review the matching percentage and check the boxes in the Tick Column for the items you want to Auto price.
Click the Auto price button. The selected item(s) will be priced with the Master cost rate, and the corresponding worksheets will be imported along with the pricing.
Display Options
You can toggle between different display levels, such as Children or up till Level 5, depending on the hierarchy and structure of the bill items in your project.
Auto price from Projects
The Auto price from Projects option allows you to price an unpriced bill item using similar items from other projects, without needing to add a Master. From this option you can choose the best priced item from your previous projects.
Access Auto price from Projects
Right-click on any unpriced bill item in your project.
From the context menu, select Auto price from Project .
This opens the Auto price window with data from other projects.
Auto price the Item
After reviewing the list, tick the checkbox of the item that matches best.
Click Auto price to automatically price the item in your project using the selected project's cost rate.
Auto price Window Overview (for Projects)
The window shows similar items from all the projects where the bill item is present. It has the same columns as the Master Auto price window, Item, Description, Unit, Project Description, Project Unit, Project Cost Rate, Percentage, Tick Column, and Actions Column.
The Materials Adjudicator allows you to compare and manage materials from different suppliers, making it easy to adjudicate rates and make decisions for your project. You can access this feature in the Resources tab.
Accessing the Materials Adjudicator
Navigate to the Resources tab.
Locate on the right side of the application toolbar and click the Materials Adjudicator icon same as the subcontractor adjudicator that you can access in the pricing tab.
Adding New Materials Adjudicator category
After clicking the Materials Adjudicator icon, the Materials Adjudicator window will open.
Click the New button to create a new Materials Adjudicator category.
The system will generate a default Category (e.g., "Materials 1"). You can rename it by double-clicking on the name.
Select the newly created Materials Adjudicator category to open the material adjudication form where you’ll add and manage suppliers.
Adding Suppliers
After selecting your adjudicator (e.g., Materials 1), the Edit Supplier window will automatically open, you can also access the manage supplier option in the right toolbar.
In the window that opens, click Add New to create a row for a new supplier (e.g., "Supplier 1").
You can now see the Supplier details, including:
Supplier Name, Attribute, and Company which you can edit as to your liking.
In the Factor field you canadjust the formula and percentage for this subcontractor's rate list.
In the Currency details define the currency code and it’ll show the conversion rate.
Rate Modifier, Total Columns and Total Unlinked tasks are also displayed
Status of Spread/Used will display information on unlinked tasks and if the supplier is in use.
An action column provides a Delete icon for supplier removal.
Once you've added a supplier, click the close button. This will update the list of suppliers in the Material adjudication form.
Importing and Managing Multiple Suppliers
You can add multiple suppliers to compare their rate lists for the materials required side by side. Each supplier will have a separate column, allowing you to evaluate different rate lists across the tasks you’ve added to the workspace.
Adding Tasks to the Materials Adjudication Form
In the Materials Adjudication form, you will need to add tasks that suppliers will be quoting against.
On the right side of the panel, locate the Copy from Resource option. Click this to open a side panel.
From the side panel, drag and drop the relevant tasks into the Materials Adjudicationform to create the supplier's bill of material. These tasks will form the basis for the supplier's pricing.
Once the suppliers are added in the material adjudication form next to the suppliers bill of material. Access the Rate List Options from the columns heading dropdown,
Import from Excel: Allows you to click or drag-and-drop an Excel file containing the rate list.
Import Cost Rates: Use this option to import cost rates directly from the resources tasks.
From Supplier: When you select this option, it opens up a dropdown with several options like,
Copy and Replace: This option allows you to either copy or replace rates from another supplier. It’s useful when you need to quickly apply rates from a different supplier to the current one.
Copy Unpriced:If the selected supplier has unpriced tasks, this option provides further choices for handling those unpriced items,
Add Highest Rate: Automatically assigns the highest rate available from the suppliers to the unpriced tasks.
Add Lowest Rate: Assigns the lowest rate from the suppliers to the unpriced tasks.
Add Average Rate: Calculates the average rate of all available rates from the suppliers and applies it to the unpriced tasks.
Add Unpriced of selected supplier: Copy the rates of selected supplier’s priced tasks and insert them in the current supplier’s unpriced line items.
Add Rates: This option allows you to add rates from the chosen supplier to the current supplier’s list.
Subtract Rates: This option subtracts rates from another supplier’s rate list from the current one. This feature is particularly helpful when suppliers are only providing specific materials, and you need to remove any unrelated rates from the supplier’s rate list, leaving only the relevant rates.
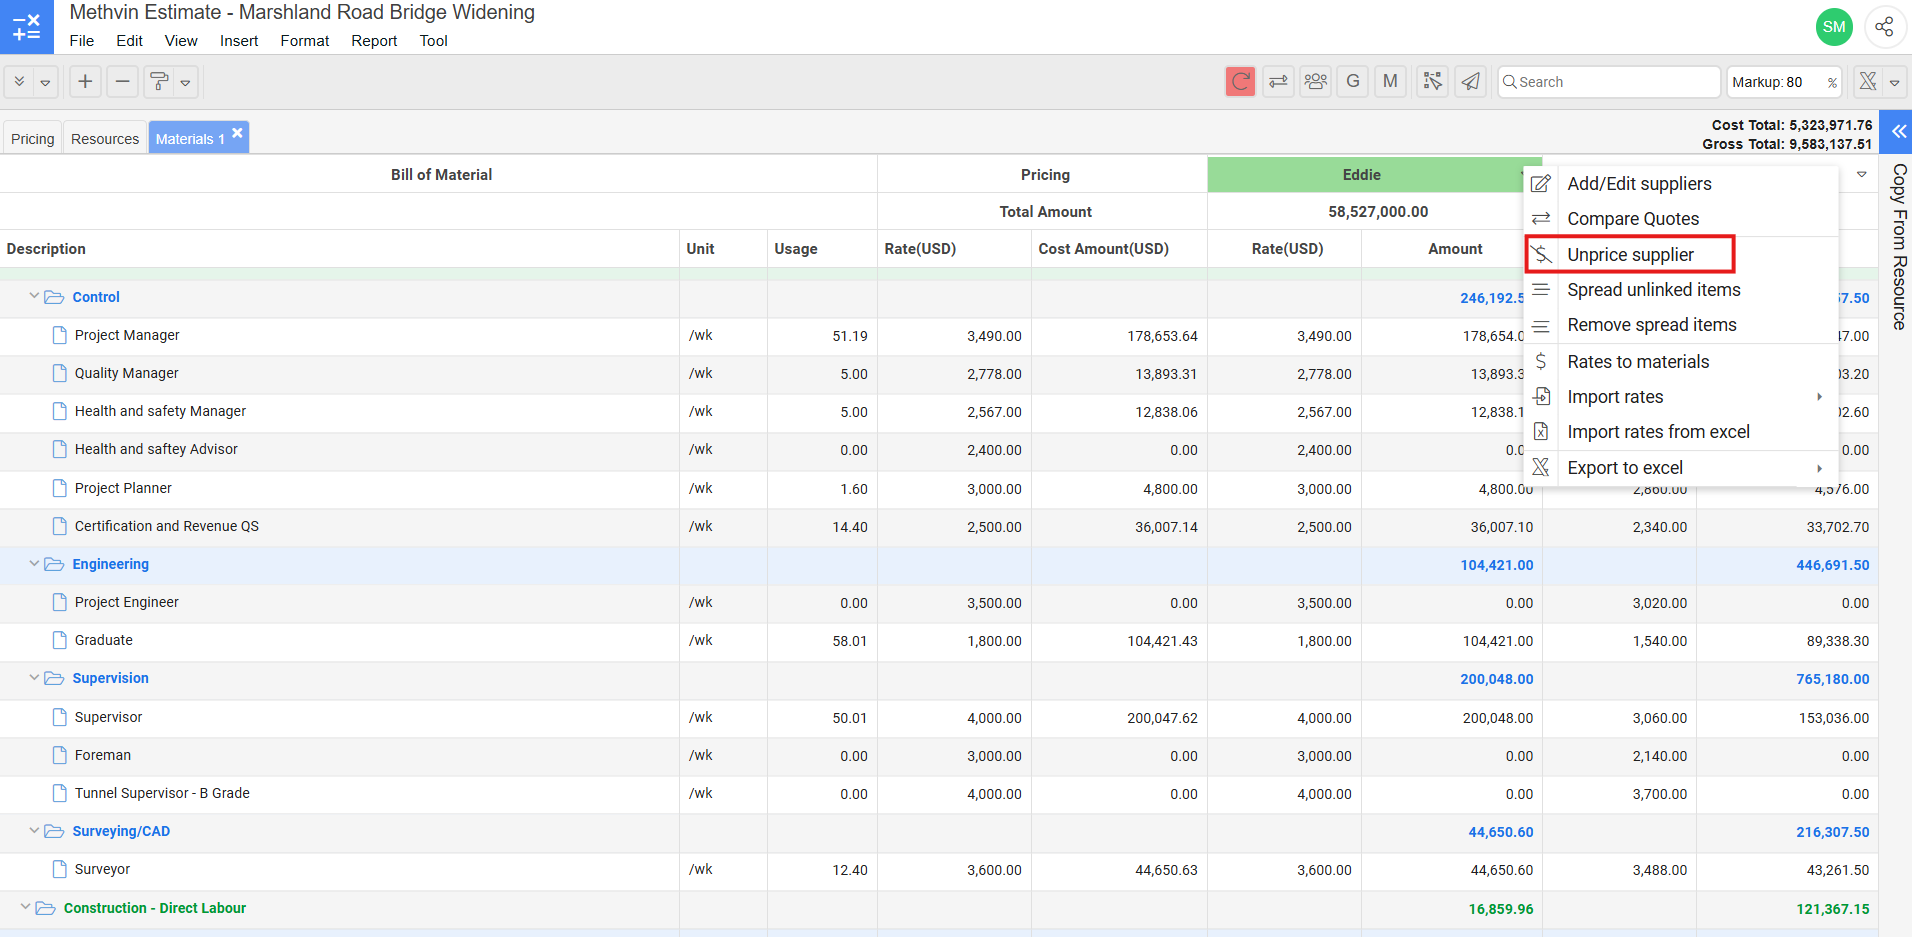
Unprice Supplier
The Unprice Supplier option in the column heading dropdown allows you to remove the pricing for the selected supplier. This can be useful if you need to clear out the rates for a specific supplier without affecting other suppliers. Once this option is selected, all rates from the supplier will be unpriced, leaving the column empty for further adjustments or updates.
Managing Unlinked Items
Unlinked items are supplier-provided items that are not in the suppliers bill of material. To handle these you can access the following options in the column heading dropdown,
Spread Unlinked Items: Spreads the rate of the unlinked item across the existing bill items, without showing the unlinked item.
The status of the supplier will show as “SPREAD” when the spread unlinked item option is used.
2. Remove Spread Items: Displays the unlinked item separately from the rest of the bill items, providing transparency for these additional tasks.
The status of the supplier will show as “UNSPREAD” when the remove spread item option is used.
Rates to Material
The Rates to Material option, accessible from the suppliers column heading dropdown, allows you to update resource rates based on the supplier rates. When selected, the resource rates will be automatically updated to match the supplier’s rates, ensuring consistency between your resources and the materials quoted by the suppliers.
Comparing Supplier Quotes
Use the Compare Quotes option to view the details of suppliers rate for materials. This includes details of the,
Column Amounts
Maximum, Minimum, Preferred Makeups
Pricing Totals etc
This comparison makes it easy to evaluate which supplier offers the best value for specific materials.
Export to Excel
The Export to Excel option allows you to generate and download an Excel file containing the supplier material rate details. This feature offers two choices:
Export Material: This option exports all the tasks in the supplier bill of material.
Export Selected Supplier: This option exports only the rate list and details of the supplier you have currently selected, allowing for a focused analysis of specific supplier data.
Methvin is a leading provider of online applications for the construction industry and our evolution is rooted in our commitment to offer only the most functional, flexible and easy to use cloud-based estimating and project management solution since 2018.
 in the toolbar.