Resources
After you have created your Methvin Web App, you can add that user as a resource. Resources are the people, materials, or costs that are required to get your project done.
Add a resource to your gantt
To add a resource to the resource pool in Methvin Gantt Web App:
-
Click Resources on the Quick Launch.
-
Click Resources>New.
-
Choose a Type for the new resource:
-
Work resources are the people who complete the tasks in your project.
-
Material resources are the tools you need to get your project done. These may include things like vehicles, computers, or conference rooms.
-
Cost resources are fees associated with your project. These may be things like lodging or airfare.
-
-
Select the Budget check box if you are adding a resource that will help you track your project budget.
-
Select the Generic check box if you are adding a resource that will represent an overall resource category, such as Developer or Contractor.
-
In the Identification Information section, select the Resource can logon to Methvin Gantt Web App check box if you want the resource to be able to log on and submit a time sheet, enter task progress, or view your project in Methvin Gantt Web App. This is typically only applicable for Work resources.
-
Do one of the following:
-
If you selected the Resource can logon to Methvin Gantt Web App check box, in the User Authentication section, type the resource’s name or email address in the User logon account box.
-
If you did not select the Resource can logon to Methvin Gantt Web App check box, type a Display Name for the resource, and then enter an Email Address, and Initials, if appropriate.
-
-
Choose the appropriate Assignment Attributes for the resource.
-
Choose a Resource Department, if appropriate.
-
In the Group Fields section, enter a Group,Code,Cost Center, and Cost Type, if appropriate.
-
In the Team Details section, if your organization uses teams in Methvin Gantt Web App, choose the options that make the most sense for this resource.
Assign a calendar to specific resource
While you might have some general working hours in your organization, some resources may not stick to those hours. You might have one person working a night shift, or someone else working four ten-hour days. Or, you might have a piece of equipment that runs nonstop. In Methvin Gantt, you can set a unique schedule for a specific resource.
Set a unique schedule for a specific resource
Tip:You can also change resource availability without using a calendar.
-
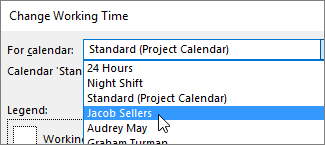
Click Project>Properties>Change Working Time.
-
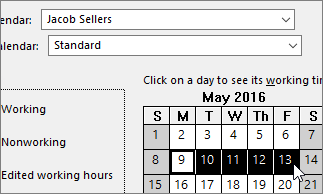
Choose a resource from the For calendar list.
-
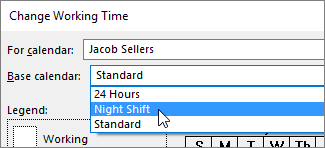
Choose the right Base calendar for the resource.
-
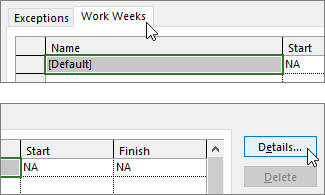
If the working times in the calendar aren't quite right for this resource, click the Work Weeks tab, and then click Details.
Note:What about vacation?Use the Exceptions tab to add vacation to the resource's schedule.Learn more.
-
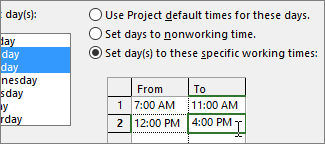
Select the day(s) that you want to change the working times for, and then choose whether you want them to be working or nonworking time.

-
If you chose Set day(s) to these specific working times, use the From and To columns to set the working times for the selected days.
-
Click OK to return to the Change Working Time dialog box, and then click OK again.
Add a resource's vacation time
If a resource is taking vacation time that you'd like to account for in your scheduling, you can add it to the resource's calendar.
Set resource vacation time
Tip:Don't overdo it!Accounting for every vacation day can make scheduling more challenging than it needs to be. A best practice is to only account for vacation time that will significantly impact your project's schedule. If a resource is just taking a day or two off, don't worry about it!
-
Click Project>Properties>Change Working Time.
-
Choose a resource from the For calendar list.
Tip:Need to change the resource's full schedule?You can use the Change Working Time dialog box to adjust the resource's working and nonworking time.
-
Select the vacation day (s) on the calendar.
-
On the Exceptions tab, type a Name for the vacation day(s), and then press Enter.
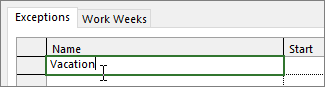
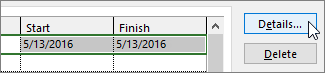
The Start and Finish dates are populated with what you had selected on the calendar, and the vacation is marked as nonworking.
-
Click OK.
Any tasks that this resource is assigned to will now be scheduled around the vacation by, typically, lengthening the number of days it will take to complete the task.
Set up repeating vacation days
Some resources may have vacation time that regularly repeats during the project. For example, they may want every other Friday off.
-
On the Change Working Time dialog box, select the vacation day you want to make recurring, and then click Details.
-
Under Recurrence pattern, set how often the vacation day will repeat.
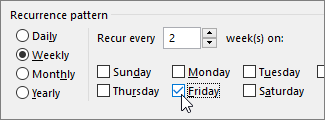
Tip:You can also set a Range of recurrence if the vacation happens repeatedly and then stops. For example, if the resource is taking every other Friday off over the summer, but will resume a normal schedule in the fall.
-
Click OK to return to the Change Working Time dialog box, and then click OK again.
View resource workloads and availability
As a project manager, one of the most important aspects of your role is to monitor the assignments for each of your resources so that you can effectively balance their workloads. Some resources might be over allocated, and others might be under allocated. You can review how efficiently your resources are being used in your project, and whether you need to make any adjustments, by viewing their workloads and availability in Methvin Gantt Scheduler.
Review resource workloads by using the Resource Usage view
-
In the Task or Resource tab, click Resource Usage in the View drop down menu.
-
Review the resource names and their assigned tasks in the table portion of the Resource Usage view.
-
Review the timescale portion of the view to see how work is allocated over the selected time period.
In many resource views, including the Resource Usage view, over allocated resources are shown in red. An over allocation occurs whenever a resource's maximum units have been exceeded for any period of time. In resource sheets, the indicator field for over allocated resources also includes the Resource leveling indicator, which indicates that the resource be leveled. Check for the indicator, and review the task assignments to assess whether the over allocation is acceptable.
For example, suppose that two tasks have a duration of four hours, and that they both start and finish at the same times. If you assign both tasks to Bob, he is technically over allocated, because during that four-hour span of the two tasks, Bob is working at 200 percent. However, if leveling is set to a day-by-day basis, Bob does not need to be leveled, because during the whole day he doesn't exceed his total eight-hour capacity to work.
Note:Along with resource assignments for tasks in the currently opened project, the Resource Usage view also displays summary resource assignments. Summary resource assignments indicate the total amount of work a resource is assigned to in all other projects.
You can also display and modify the Resource Usage view to see all of the resource assignments and their percentages of work allocation in a time sheet. This view shows all assignments by resource, and shows how fully these resources are allocated to assigned tasks over time.
-
In the Task or Resource tab, click Resource Usage in the View drop down menu.
-
In the Format tab, click Add Details.
-
In the Available fields list, click Percent Allocation, and then click Show.
-
Review the timescale portion of the view. In the % Alloc. row that you've just added, you can see the percentage of the resource's total available working time that is allocated to assignments during the selected time period. In addition, the timescale portion of the view shows both the resource's over allocated work and its allocation percentage in red, making it possible for you to pinpoint exactly when the resource becomes over allocated.
Tip:You can zoom in on the time period shown in the timescale (for example, you can change the view from days to hours) by clicking Zoom In (+)located at the bottom right corner of the window. Likewise, you can zoom out from the time period (for example, you can change the view from days to weeks) by clicking Zoom Out (-).
Review availability for enterprise resources by using Methvin Gantt Online
To find over allocated or under allocated resources either within a project or across projects, you can access Methvin Gantt Online and view a graph and table of resource availability.
-
From the Methvin Gantt Online Project Center, click Resources in the left side menu.
-
Select the resource or resources whose availability information you want to view by selecting the check box next to their name and then in the Resources tab, click Capacity Planning in the Navigate section.
To select adjacent resources in the list, hold down SHIFT while you click the first and then the last resource. To select nonadjacent resources, hold down CTRL while you click each resource.
-
In the Views section of the Availability tab, select a resource view.
-
To display assignment work grouped first by resources and then by the projects that the resource appears in, select Work by Resource.
-
To display assignment work grouped by the projects that the resource appears in, select Resource Utilization by Project.
-
To display the amount of time that the resource has available to work during a specified time period, select Remaining Availability.
-
To display the amount of work that the resource is assigned to do, select Resource Utilization.
-
-
If you selected multiple resources on the previous page, you can click in the legend on the chart to select the resources that you want to view in the graph.
The Details table below the graph shows a timescale that displays how much work the resource is assigned to during the specified time period.
Tip:To see a different date range in the chart, click Set Date Ranges in the Availability tab, and then select new dates in the Set Date Range boxes.
View a list of resources who are over allocated
You can see a list of only those resources that are over allocated by displaying the Resource Sheet view or the Resource Usage view, and then filtering for over allocated resources.
-
In the View section, click Resource Sheet or Resource Usage from the drop down.
-
In the View tab, click the Filter drop down menu in the Data section, and then click Over allocated Resources.
-
To see the full list of resources again, click the Filter drop down menu and then click No Filter.
Note:Even without filtering for over allocated resources, you can easily see which resources are over allocated, because their names are shown in red in any resource view. Also, in the Resource Sheet and Resource Usage views, the indicator field will suggest that over allocated resources be leveled.
Task views can also be used to display over allocations, though they don't show over allocations in red the way that resource views do. If you are working in a task view, you can step through each task that has resource over allocations, though a task view won't show you which resources (or how many) are over allocated.
While in any task view, such as the Gantt Chart or Network Diagram, in the Resource tab, click Next Over allocation in the Level section.
Group resources who are over allocated
In the Resource Sheet or Resource Usage view, you can group resources who are over allocated. You can also group resources by their peak units, which indicate their maximum percentage allocations on assignments during the project. Reviewing over allocated resources by the extent of their over allocations can help you to focus on the most extensively over allocated resources first.
-
In the View section, click Resource Sheet or Resource Usage.
-
In the View tab, click on the Group by drop down menu and then click New Group By.
-
In the Field Name box, select Over allocated.
-
In the Order box, select Ascending or Descending.
If you click Ascending, the group of resources that are not over allocated appears first and the group of over allocated resources appears second.
-
To create a nested grouping of peak units, click the Then by box, and then click Peak.
-
Supply a name for the grouping and then click Apply.
The view is grouped according to your specifications. Any resource that has any assignment exceeding 100 percent of peak units at any time during the project is grouped under Over allocated: Yes. If you specify a nested grouping of peak units, you might have additional groupings under headings such as Peak: 200%,Peak: 300%, and so on.
-
To see resources listed in their original order in the Group by box, click [No Group].
Find resources who have available time
If you have resources who are over allocated, you might want to identify resources in the project who have available time, so that you can distribute the workload more evenly. This capacity is also useful if there are additional unassigned tasks and you want to find out who is available to take on more work.
Resource availability is calculated using the following formula:
Resource Availability = Resource Capacity - (Summary Resource Assignment + Calendar Exceptions)
The Summary Resource Assignment is the sum of all work done by the resource, and Calendar Exceptions are any exceptions on the resource's base calendar.
To find resources who can work additional hours on a job, you can display and modify the Resource Usage view to see the amount of time (hours, days, or weeks) that a resource has available for additional assignments. You can also use this view to redistribute work from over allocated resources to under allocated ones.
-
In the View section, click Resource Usage.
-
In the Format tab, in the Details section, check the Remaining Availability box.
-
In the Rem. Avail. (remaining availability) row, review the amount of work that represents remaining availability, or under allocation, for each time period.
You can also display and modify the Resource Graph view to view a bar chart of an individual resource's workload, which can help you to discover who can work additional hours on a task. You can review information about one under allocated resource at a time in the Resource Graph view. You can see the amount of available work by time period.
-
In the View section, click Resource Graph.
-
In the Format tab, click the Graph drop down menu, and then select Work Availability.
-
For the selected resource, review the amount of available work shown in the bar chart. Scroll through the timescale to see under allocations during varying periods of time.
-
Review the amount of available time for the selected resource at the bottom of the graph.
-
To move to the next resource that has available time, press PAGE DOWN or use the scroll bar or the arrow keys in the left pane.